Working with Labels
The Labels page displays all the labels available in the selected EPMM instance as paginated lists. Use the search box to enter and find labels quickly. The list displays the counts of devices in various states as hyper links. Click the count links to display the Migrating Devicespage with the corresponding label filter applied. Use the drop-down box to switch between EPMM instances. This switch to a different EPMM instance reflects on other pages of the Migration Portal as well.
Migrating devices based on a label
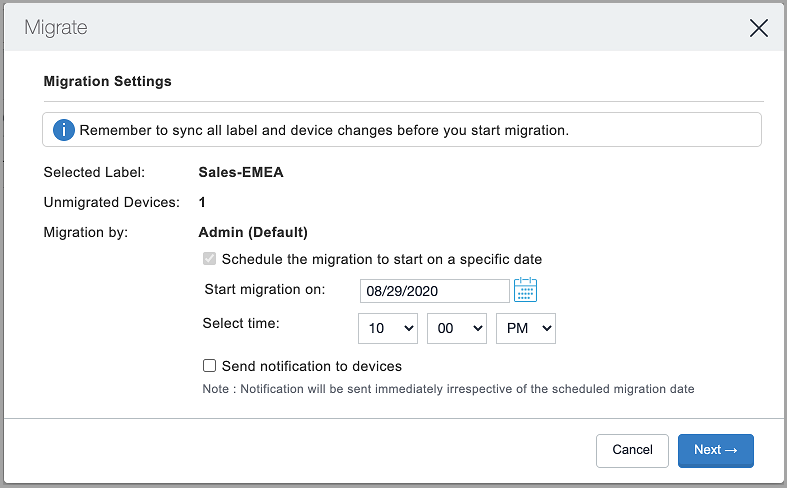
Use the Labels page to select a single label to initiate label-based device migration by administrators and by device users. Remember to sync all label and device changes before you start migration.
Procedure
- Click the Refresh icon to sync all label and device changes from EPMM.
- Ensure that no sync jobs are in progress before initiating the migration. This is to avoid mismatch in number of devices migrated under a label.
- Select a single label. Multiple labels cannot be selected simultaneously.
- Click Migrate.
- In the Migration Settings window, review the Selected Label name and the count of Unmigrated Devices.
- Select one of the following options from the Migration By field:
- Admin (Default) - This is the default option. Optionally, select Schedule the migration to start on a specific date. Specify the start date and time based on the browser timezone. See the "Setting up scheduled migrations" section for more details.
- Device User - This option allows the device users to start migrations Using the Device Migration Portal. Users can log into the portal with their credentials and initiate the migrations.
-
(Optional) Compose and send notifications to all the devices in the selected label for migration using the Send notification to devices option via Send Email and Send Push Notification options. See the "Sending notifications to all devices in a label" section for more details.
- Click Next.
- Click Start to begin migrations or click Save for scheduled migrations.
Setting up scheduled migrations
Administrators can schedule migrations of devices assigned to a specific label. This is useful to plan end user device migrations to begin at the specified time and date. Remember to sync all label and device changes before creating a schedule.
Procedure
- Ensure that no sync jobs are in progress before initiating the migration. This is to avoid mismatch in number of devices migrated under a label.
- Select a single label. Multiple labels cannot be selected simultaneously.
- Click Migrate.
- In the Migration Settings window, review the Selected Label name and the count of Unmigrated Devices.
- For the Migration By field, select Admin (Default).
- Select Schedule the migration to start on a specific date.
- Specify the start date and time based on the browser timezone. The scheduled start time cannot be less than 30 minutes from the current time.
-
(Optional) Select the Send notification to devices option via Send Email and Send Push Notification options. Notifications will be sent immediately irrespective of the scheduled migration date and time. Information about these notifications is available in the Migrations page upon clicking the options menu for the migration name. See the "Sending notifications to all devices in a label" section for more details.
- Click Next.
- Click Save.
- You can view further details of the migrations in the Migrationspage.
- After a scheduled migration request is created, individual device migrations are not allowed for the devices belonging to the schedule. If required, delete the scheduled migration and start device migrations.
- After a scheduled migration is created, it is recommended to not make any changes to label used in that migration. In this period, any changes to the label will not reflect in the scheduled migration. For example, if devices are removed or added to the label, the scheduled migration will continue with the set of devices that was available in the label when the migration schedule was created.
- If a device is set for scheduled migration, then a user-controlled (migrated by Device User) migration cannot be triggered for that device.
Editing scheduled migrations
Administrators have the option to modify scheduled migrations.
Procedure
- Go to the Migrations page.
- (Optional) In the filter options (on the left), select Show Scheduled Migrations only.
- Click Edit Schedule against the required migration name.
- In the pop-up window, modify the schedule details as required.
- (Optional) Select Send notifications to devices. Notifications will be sent immediately irrespective of the scheduled migration date and time.
- Review the updated schedule details and click Next.
- Click Save.
Deleting scheduled migrations
Administrators have the option to delete scheduled migrations only until the scheduled time, after which they cannot be deleted. After a scheduled migration request is created, individual device migrations are not allowed. If required, delete the scheduled migration to revert to individual device migrations.
Procedure
- Go to the Migrations page.
- (Optional) In the filter options (on the left), select Show Scheduled Migrations only.
- Click Delete Schedule against the required migration name.
- In the Delete Schedule pop-up window, review the schedule details.
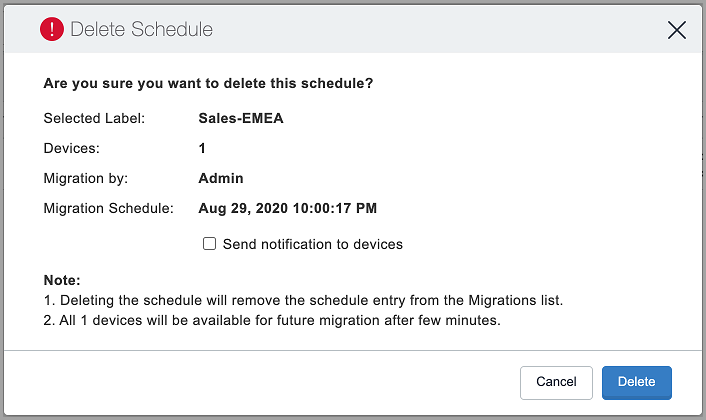
- (Optional) Select Send notifications to devices. Notifications will be sent immediately irrespective of the scheduled migration date and time.
- Click Delete. The migration schedule is deleted. The devices will be available to be migrated immediately at the device/label level or to be set for user controlled migration.
Prerequisites for Device Users
Users whose devices are being marked for User Controlled migrations must meet the following prerequisites to start migrations in the Device Migration Portal:
- If the user is a local user, the local user must be created in Ivanti Neurons for MDM so that the user can log in to the Device Migration Portal with those credentials and trigger device migrations.
- If the user is an LDAP user, the LDAP server needs to be added to the tenant and the user needs to be imported so that the user can log in to the Device Migration Portal with those credentials and trigger device migrations.
Managing the labels
In the Actions column, you can perform any of the following actions If the migration fails:
- Click the View Notifications link to view the notifications sent to a label.
- Click the View Migrations link to view the migrations triggered on a label.
- For devices whose migrations have been triggered and failed, click the Retry Failed Devices option.
This option will retry migration on all devices in this label that are in the Failed status.
- This option will be available when the total number of devices for which migration has failed is greater than zero.
- For devices of a label that are stuck during migration where there is no progress in migration for the last 20 minutes (for example, a device that is not in the network, a device that is not checking in), click the Force Retry In-Progress Devices option.
- This option will initiate the "Force Retry" option on all applicable devices in this label.
- This option will be available if a label has one or more devices with in-progress migrations.
- Use this option only if you are sure that the devices are still active, but the migrations have not been successful.
- Two immediate Force Retry actions will not be performed within a gap of 20 minutes even if the devices belong to multiple labels.
- In the Labels page, click the graph icon corresponding to a label in the Export CSV column to export a CSV file containing a list of devices and their details.
Sending notifications to all devices in a label
You can compose custom message and send email and push notifications to all devices in a selected label. Notifications will be sent immediately irrespective of the scheduled migration date and time. The number of devices in a label for sending notifications is limited to 5000 devices. The content and length of the message is limited based on EPMM limitations. Notifications are restricted to one per hour for a label.
Procedure
- Go to the Labels page.
- Select a label.
- Click Send Notification. The Send Notification button will be enabled on selection of single label if the label has at least one device for which migration has not started.
- In the Send Notifications window, select either Send Email and Send Push Notification or both the options.
- For emails, enter the Subject.
- Enter the Message.
- Click Next.
- In the Send Notifications - Confirm window, review the details and the preview of the message.
- Click Send.